Pages

Tuesday, July 30, 2013

Two For One with Gingham Garden

Isn't it funny how your taste in things can be all over the place?  I ask because while on the one hand I truly love CAS cards with tons of white space, and while on the other I love elegant and beautiful DSP's, on the third hand (may I borrow one of yours please as I seem to have run out of hands somewhere in there), I adore cute paper and gingham.  Absolutely adore it. 

So, when I got my hands on SU!'s "Gingham Garden" DSP, it was love at first sight.  I've made a couple of cards with stamped images using the paper, but when crafty with Lissie a couple of weeks ago, I decided to go simple and minimalist.  I mean, REALLY minimalist.  I cut paper and glued it to a base and then to doll it up added a bit of "Delicate Details" tape.  That was it.  I can go back and add an image at some point and doll it up a bit, OR, I can just leave well enough alone.  Either way, it's delightful.

But, then, I had to play some more.  I pulled out another sheet of DSP, cut it, and oh boy.  I couldn't just stop there.  There was "Gingham Garden" washi tape to be played with (I do love me some washi tape)!  There were new framelits to explore.  There were candy dots (CANDY DOTS!).  Before I knew it, we had this going on and I loved it. :o) 

A tip about using washi tape: washi is transparent and will allow whatever paper you have behind to show through.  If you want it to look as it does on the roll, adhere it to a piece of scrap white first and then cut it out.  Yes, it's a bit more work than the first card, but the end results are worth it. :o)

A crooked photo with very simple detailing on the inside.

I'll be shipping this card along with a bunch of others to Jaydee for her OWH card drive.  I encourage you to join in and send along all those cards you have lurking about.  It's for SUCH a worthy cause! :o)

***************************
This card uses:

*Inks: Island Indigo
*Papers: PTI's white card stock, Whisper White, Gingham Garden DSP
*Stamp Set: "Four You"
*Accessories: Dimensionals, Gingham Garden washi tape, candy dots, Labels Collection Framelits

--Rach

Monday, July 29, 2013

Madison Avenue

I tend to make cards using DSP, so I decided to try to make a few using only stamps and cardstock. So along with my quest to use supplies I've had but ignored, I also wanted to try to make a few C & S (clean and simple) cards. Here is one I came up with.

Card Front
On the front of the card I used two stamp sets: Madison Avenue--for the flowers--and Outlined Occasions for the greeting. I stamped the images using Pear Pizzazz and Calypso Coral inks on Whisper White cardstock and popped up the image using dimensionals. I added brads to the center of the flowers. These are Stampin' Up brads in Calypso Coral that I found tucked away in a safe place. I can't even remember when I acquired them but they sure worked well on these flowers.

Inside of card
For the inside of the card I used Calypso Coral cardstock and and stamped the image on Whisper White. I added printed brads in Calypso Coral to finish off the flowers. Overall I'm happy with the result.

--Lissie

Sunday, July 28, 2013

Another Mosaic Madness CASE

First off, a shout out to the fine ladies at The Paper Players, Jaydee in particular, for selecting this card as their "Headliner" for their challenge last week.  Thank you SO much!!

Lissie found this card when searching for ideas for using "Mosaic Madness".  While I adored the card at once--especially the colors used!--I wanted to make it my own and create a card with a more summery feel.

This card was a royal pain in the patootie to make!  Sure, it looks simple enough, but stamping that main panel was painful and fiddly and never could have happened without grid paper and my stamp-a-ma-jig.  Eesh!  I'm good at eyeballing when it comes to cooking, putting together bulletin boards and estimating if an article of clothing is going to fit my girlies.  I'm not good at eyeballing when it comes to stamping and alignment of images...

I began by eyeballing (okay, I lied a bit up there) and drawing lines across both the horizontal and vertical midway points to not only find the center, but to also help me line up the images and space them.

I began by stamping the Calypso Coral images first and then added the Sahara Sand images after.  It doesn't look as if it would take long...yeah.


And, here's the inside.  It's simple, but effective. :o)

I do love this card, but I'm not sure I would be willing to make another anytime soon. :oP

*************************
This card uses:

*Inks: Sahara Sand, Calypso Coral
*Papers: Whisper White, Sahara Sand, Calypso Coral, vellum
*Stamp Set: "Mosaic Madness", "Curly Cute"
*Accessories: dimensionals, pearls, mosaic punch

--Rach

Saturday, July 27, 2013

Tea Shoppe


I made a commitment this week to make a few cards using supplies I've bought but never found a way to use. Long ago I bought the lattice die but never could come up with an idea as to how to make it work on a card. Then, I noticed the Tea Shoppe stamp set on my shelf--which I have utilized once or twice in the past--and decided to see if I could make the two work together. I found an old sheet of DSP from 2007. It's so old that I do not know the name but it features 2007 SU In Colors, Groovy Guava and Soft Sky. I decided to cut the sentiment to look like a tea bag with a string (butchers' twine) and used Soft Sky ink. The tea cup is stamped in Chocolate Chip. I had to fussy cut it (as Rachael says) because there's no die for that big tea cup. At the bottom I added Very Vanilla lace and a few Very Vanilla roses. The base of the card is Whisper White. All the supplies are from Stampin' Up.

--Lissie 

Friday, July 26, 2013

Paper Players' Challenge #155 Redux


For this second, whimsical birthday card, I again used the Button Buddies stamp set and So Happy for You for the sentiment. The piggie's nose is a Pretty in Pink button. The DSP is Gingham Garden. Melon Mambo buttons in the upper left finish it off. In this next photo you can see the strip of DSP I used on the inside.


--Lissie

Paper Players' Challenge #155


I love this simple layout. In fact it's one of my all-time favorites that's been posted to Paper Players. Yet I struggled with it all week. At long last this morning I came up with two ideas. This first one I will send to my niece whose 6-month old baby is waiting for a liver transplant. 

Here's what I used:

Cardstock: Pool Party and Whisper White
Stamp Set: Button Buddies
DSP: Eastern Elegance
Stamp Set: So Many Sayings
Accessories:Pool Party brad, silver glitter, and rhinestones


 On the inside of the card I used Whisper White cardstock and Eastern Elegance DSP.

--Lissie

Wednesday, July 24, 2013

CAS Butterfly of Hope

The sketch over at The Paper Players has been rolling around in my head and I keep thinking of ways I can play with it. And, because I played with it, I just had to enter it...

Yesterday afternoon I was determined to use this butterfly--this utterly gorgeous butterfly I've never been able to use well--and make a lovely card.

I'm not sure where the inspiration came from, but I decided instead of using a paper circle behind the butterfly, I would sponge a sky for her.

I cut my paper sized to match my card face (3 7/8"x 5 1/8"), and placed my circle Nestie where I wanted my circle to be on my card.  I then taped the mask I made to my card face and sponged the circle using Pool Party. 

Now, I tried Soft Sky first, but it just wasn't bright enough.  However, sponging the Pool Party straight up was too intense.  Sooooo, I got some ink on the sponge (straight from the stamp pad), stamped off a couple of times and then hit my card face with the ink.  It made for a softer, subtler sky--like a really hot intense humid sky...not that I would know anything about those around these parts...:oP

I decided the best way to use the butterfly would be with her fussy cut out.  However, I knew I only wanted her partially popped up, so I stamped her once on the circle (with her right wing hanging outside the space), and then adhered her, using squishy dimensionals under her wings.

I futzed around with the sentiment and that horizontal piece for quite some time before settling on the subtlety of vellum.  I finished the card off with a few pearls--she needed a body!

It's definitely a softer, more delicate card, but the more I look at it, the more it grows on me.  :o)

***********************
This card uses:

*Ink: Cameo Coral (retired--oh how I LOVE this color)
*Papers: Cameo Coral, Whisper White, PTI's white card stock for the base and mask, vellum
*Stamp Sets: "Sweet Essentials", "Strength and Hope"
*Accessories: dimensionals, pearls, glue dots (for adhering the vellum)

Tuesday, July 23, 2013

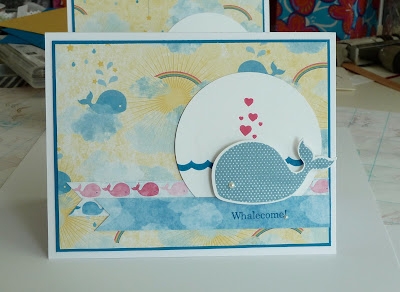
Whalecome Baby for Dani and PP115

There's nothing quite like a visit with Lissie to get my mojo flowing.  Combine that with an awesome sketch challenge, and I find myself thinking all day and even dreaming about cards I can make.  Anyone else have that problem? :oP

I've been meaning to make a baby card for Dani, to welcome her sweet babies and knew I could combine the challenge over at The Paper Players with the "Oh, Whale" stamp set to create a really cute card.  Not that I'm tooting my own horn or anything...:oP
 
I just adore this little whale and the sweet DSP that coordinates so beautifully with him.  I stamped the water in Pacific Point on a piece of scrap white and cut out the circle using my circle nesties.  I stamped Mr. Whale in Marina Mist on that same scrap and cut him out using the coordinating die.  (I do so love dies that coordinate with stamps!) I then placed him, marked where I would want a waterspout to be and stamped the hearts using Melon Mambo. 

I mounted Mr. Whale on some tall dimensionals and put him down after I added the banner piece. 

I LOVED the little pink and blue whales on one of the pieces of the "Sunshine and Sprinkles" DSP because they were perfect for Dani's little wee ones--a boy and girl. :o) 

I adhered the large DSP to a piece of Pacific Point and put the whole card together.  (Whatever would I do without my stamp-a-ma-jig to get the sentiment straight?!?) And, because there was a space for it, and I really can't seem to help myself, I added a pearl for his eye and another for the point on the exclamation mark (or, as my friend would call it, the "pling" hee hee). 

Oh, and because I truly believe it's impossible for me to make a card without dolling up the inside a bit, here ya go. :o)

***********************
This card uses:

*Inks: Melon Mambo, Pacific Point, Marina Mist
*Papers: Pacific Point, Whisper White, "Sunshine and Sprinkles" DSP
*Stamp Set: "Oh, Whale"
*Accessories: dimensionals, pearls

Sunday, July 21, 2013

Mosaic Madness Anniversary Card

Because I love this stamp set so much, and because Brien's favorite color is green, I used the same layout for Lissie's birthday card to make my anniversary card for my honey.  I swapped out the papers and the stamp I used for the "medallions". 

This card uses:
*Inks: Coastal Cabana, Pistachio Pudding
*Papers: Coastal Cabana, Pistachio Pudding, Whisper White, and PTI's white card stock
*Stamp Sets: Mosaic Madness, Express Yourself (2013-2014 hostess set)
*Accessories: Dimensionals

--Rach

Saturday, July 20, 2013

Lissie's Mosaic Madness Birthday Card

So, if it's not obvious yet (it will be soon, I promise), I'm in love with this stamp set.  It's incredibly versatile and easy to use, and heck, it's fun.  And, what's not to love about coordinating stamp sets, punches and embossing folders?!?

Combine "Mosaic Madness" with the new In Colors which I utterly adore, and I was as happy as a pig in mud when I was making this card. :o)

**************************
This card uses:

*Inks: Strawberry Slush, Coastal Cabana
*Papers: Whisper White, Strawberry Slush, Coastal Cabana
*Stamp Sets: "Mosaic Madness", "Curly Cute"
*Accessories: pearls, dimensionals

Friday, July 19, 2013

Beautifully Baroque Heat Embossing

I don't know about you, but when a new box of product arrives I can't wait to dive into it headfirst! :o)  Well, a shipment arrived Tuesday--as did Lissie--and I savored each new item I discovered. 

When I first saw the new SU! catty, I fell in love with the "Beautifully Baroque" stamp and embossing folder (and the Eastern Elegance DSP while we're on the subject--last night many cards were made using that DSP).  When I found the embossing folder, I knew I wanted to try out something a little different and fun. 

I inked one side of the folder with VersaMark and then ran it (and the paper) through my Big Shot (I finally have one!!!).  I decided I wanted a summery, airy feel to the card so I covered it in Pool Party embossing powder and this was the result.  :o)

I added the sentiment on a banner and backed both the paper and the sentiment with Coastal Cabana.  I'm a sucker for bling and knew pearls would be the perfect touch for finishing off the card.

Here you can see a close-up of the heat embossing.  There was residual embossing powder left on the high points, but I left it, thinking it would give the image a softer feel and a touch of definition. 

This was an incredibly easy card to make, and yet it packs a BIG punch. I'm definitely adding this to my list of go-to's when I need to make a card in a hurry!

***********************
This card uses:

*Inks: Coastal Cabana, VersaMark
*Papers: Coastal Cabana, PTI's white card stock (I feel it dry embosses better since it's slightly thicker than SU!'s Whisper White.)
*Stamp Set: Sweet Essentials
*Accessories: Pool Party embossing powder, heat gun, pearls

Thursday, July 18, 2013

Mosaic Madness Birthday Card for Paul with Cutout

Paul's birthday is next week, so while I'm here in Williamsburg with Rachael, I decided to play with my brand new stamp set, Mosaic Madness to make him a card. Mosaic Madness is the most versatile set I've ever used and expect it will be Stampin' Up's biggest seller ever. I also purchased the punch and the embossing folder that complement the stamp set and decided to use all three to make the card. Then, I got the idea to punch out one of the cells on the front of the card and place one of the punched images inside the card to peek through.

After I embossed the front piece I punched out the piece at the bottom right (see below).


Next, I stamped and punched the three images. The inks I used are Gumball Green, Night of Navy, and Raspberry Ripple. I put the red and blue ones on the front of the card using demensionals so they'd pop up and glued the green one inside the card aligning it to fit perfectly into the punched-out space. 


Here on the inside of the card, I attached the birthday greeting. To make it I used one of the sentiments in the Friendly Phrases stamp set, which I cut out using a Framelit.

--Lissie


CASEing Another Card

So...Lissie was putzing around on the 'net the other evening, looking around for ideas for a card using "Mosaic Madness".  She came across this card and fell in love.  It was decided we had to make it (oh, and let it be known she will be making a card using the colors from that card at some point!), but somehow make it our own.

Earlier in the day we were talking about retired SU! colors and which ones I was sad had gone.  I mentioned I held onto Only Orange because it was such a true orange and that I loved pairing it with Melon Mambo.  That decided it, and we needed one more color and I determined the new Strawberry Slush would be perfect with them. 

Having settled all that, we got to work. 
The card is a teeny bit labor intensive because we spent time fussy-cutting the centers for some of the images. 

I think the original card (I'll admit I didn't read the post--shame on me) used VersaMark for the image across the bottom and the sentiment.  I went ahead and used the same ink as the paper. 

We also used pearls in the place of the rhinestones, and I couldn't resist dotting the "i's" with them either. :o) 

I thought a card that labor intensive should have a lovely inside as well so we stamped the corners. 

I love the bright cheeriness of this card and am really pleased with how it turned out. :o) (Of course, would I post a card I thought was a clunker?  ;oP Well, knowing me, I just might...:oP)

*************************
This card uses:

*Inks: Melon Mambo, Strawberry Slush, Only Orange (long retired)
*Papers: Strawberry Slush, Whisper White
*Stamp Sets: "Mosaic Madness", "Sweet Essentials"
*Accessories: dimensionals, pearls

--Rach

Wednesday, July 17, 2013

Paul's Birthday Card and a Color Challenge


Lissie's here, and when Lissie's visiting, cards are being made--many, many cards. :o) It turns out this extrovert loves company when making cards and the mojo is aflowin'.

Paul's birthday is coming up soon and I needed a card. (Actually, July is a crazy birthday month for our family--six birthdays!) Masculine cards are so tough for me so I went poking around to see if I could find inspiration on the challenge sites.  I found a color challenge over at The Paper Players and thought I would give it a go.

I markered the cupcakes and fussy-cut them out.  I then adhered them using dimensionals to give it some pop.  And, speaking of "pop", I knew I wanted the sentiment to shine so I stamped and backed it with Crushed Curry.  I'm really loving white space at the moment (I think it's the heat, too much stuff just makes me feel even hotter...) so I left the rest of the card as is. 

Well...except for those little cherries on top.  No, they're NOT part of the challenge, but the cupcakes were practically begging for them.  I used my copics to color a medium sized pearl for each and adhered them. 

I know the banner overhangs the edge, but I plan on having Lissie hand-deliver it, so no worries.  :o)

*************************
This card uses:

*Paper: Baked Brown Sugar, Bermuda Bay, Crushed Curry, Whisper White, red Copic markers
*Stamp Sets: "Patterned Occasions", "Curly Cute"
*Ink: Baked Brown Sugar, Bermuda Bay, Crushed Curry
*Accessories: pearls, dimensionals

--Rach